Floor to Ceiling Mounting Installation
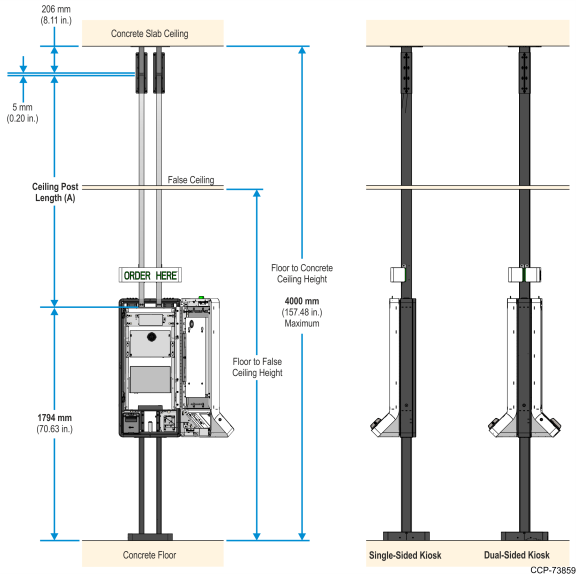
Floor to ceiling installation requires the kiosk to be bolted to the floor using four anchors and to the concrete slab ceiling using four anchors. It is the responsibility of the owning institution to provide the anchors to secure the kiosk.
If a False Ceiling is present, an access hole needs to be cut out on the False Ceiling to pass the Ceiling Posts towards the concrete slab.
The Ceiling Posts need to be cut to length as appropriate for the Floor to Concrete Ceiling height of the installation site.
Maximum installation height is 4000 mm (157.48 in.).
For more details on Site Requirements and Site Preparation,
Installation Overview
1.Install the Floor Mount, see Installing the Floor Mount
2.Install the Main Frame, see Installing the Main Frame.
3.Install the Door Assembly, see Installing the Door Assembly.
4.Install the Display, see Installing the Display.
5.Install the Printer, see Installing the Printer.
6.If required, install the PIN Pad terminals, see Installing PIN Pad Terminals.
7.Cut the Ceiling Posts to the appropriate length, see The Ceiling Posts have an initial length of 2000 mm (78.74 in.). This length needs to be cut to length A as appropriate for the Floor to Concrete Ceiling height of the installation site. Refer to one of the following sections as appropriate for your height installation requirement:.
8.Install the Ceiling Posts, see Marking mounting holes for the Ceiling Mount assembly requires at least two persons and the use of a step ladder or a work platform..
9.Install the Ceiling Mount, see Installing the Ceiling Mount assembly requires at least two persons and the use of a step ladder or a work platform..
10.Install the Signage, see Installing the Signage.
11.Route the Internal Cables, see Routing and Connecting Internal Cables.
12.Connect the External AC Power Cord and LAN Cable, see Routing the AC Power Cord and LAN Cable.
13.Verify if kiosk installation and cable routing are correct, see Verifying Kiosk Installation and Cable Routing.
14.Turn ON the kiosk, see Turning ON the Kiosk.
15.Load the printer with a Paper Roll, see Loading Printer Paper Roll.